Custom Engine
Table of Contents
Introduction
OpenGL
PlayStation
Final Result
Optimization
Overview
The Custom Engine is an 8 week lasting project focussed on the production phase of game development. For this project our team consisted of 4 programmers (including myself). We had a specific role assigned to us, where I was a graphics programmer and my 3 team members were gameplay programmers.
Besides my role as programmer in the team, I was also the Product Owner for the project meaning I had responsibility of creating the product backlog, maintaining clarity of the backlog and setting the sprint goals. And I was communicator to other disciplines (Visual Art and Design & Production) and teachers.
The project was divided into 2 sprints each lasting 3 weeks. The goal for the entire 8 weeks was recreating the target project in our custom engine (from scratch) and have it working on PC and PS4. We also had to separate the static library (Engine) from the game project, so that it could be re-used in theory.
My Role
During the initial planning I counted on OpenGL working on PlayStation. But during the first week I found out that it is not natively supported. Meaning I had to change my plan of having 1 Rendering API to having 2. Requiring me to make an interface for the Renderers. That interface would be the only way of interacting with the Renderers.
OpenGL
Since I already have some experience with OpenGL I will keep it short on how I load in models for that. I have vertex buffers which contain data that gets sent to the GPU once. There shaders do some calculations with those vertices, and out comes the image. I made sure that we have reusable code for it so I decided to make a seperate OpenGLHelpers class with all the functionality for that. So loading .obj files isn't difficult since I am allowed to use tinyObjLoader. And all of this has to be abstracted away in a model class because I am using 2 graphics API's to also deploy on PlayStation4. So after I got a camera in place, have the same output on both platforms I wanted to have Lighting in OpenGL. So I modified my shader to also make ambient, diffuse and specular lighting. You have to look really close for the specular though.
Lighting
Here you can see my model rendered in OpenGL with Diffuse, Ambient and Specular lighting. For the Specular lighting you really need to look hard, but it's there
PlayStation
Sadly I am not allowed to go in any specifics on what I learned, which makes it very hard to prove that I learned it. But PlayStation4 has it's own provided Graphics API, and that one has 2 versions. Gnmx wraps around Gnm. Click here to read more. But let's assume that it is quite more difficult because I have to submit a vertex buffer in a format I have never seen before to a shader written in a shader language that I have never seen before. And that .obj's require textures, but those aren't loaded in the same way as OpenGL. Overcoming those challenges, I got model rendering to work identical on PlayStation. Using the Gnmx of course.

Lighting PS4
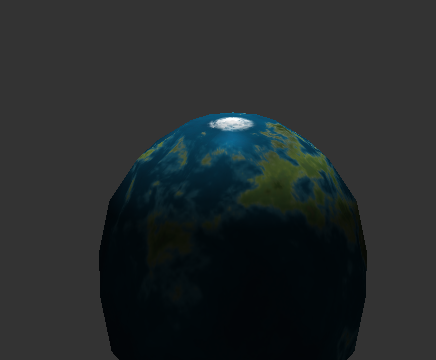
Here you see the Playstation renderer

Lighting Windows
Here you see the OpenGL renderer where it is more glossy
Final Result
With my abstracted away renderers, I can draw up to 100 objects (with different models using lazy loading). I can render up to 100 lights, but after some major speed optimizations I can only draw up to 10 lights on Windows. Which with some tweaking can be back to 100 with similar speed. Using the lazy loading I can easily switch an object to be a different model, all I would need to do is model::SetModelName("the_new_Model.obj") and it would be on the same place with the same rotation but the new model.
I made a text renderer for OpenGL, which does a batched draw call per font. But because of time limitations I could not implement it for PlayStation. So in the end there is a difference between the platforms, but only because of time restriction.
PS4
using Gnmx

Windows
using OpenGL
Optimization
So when I profiled the game after finishing my code I noticed that the OnDraw event takes up 58% of the total frame time. Then I looked what caused that to be, which is to my surprise string operations. I profiled it in debug, to my mistake. Which a teacher noted me on and showed me the correct way. But in debug strings were taking up 25-30% of the total frame time. So I had to optimize that.
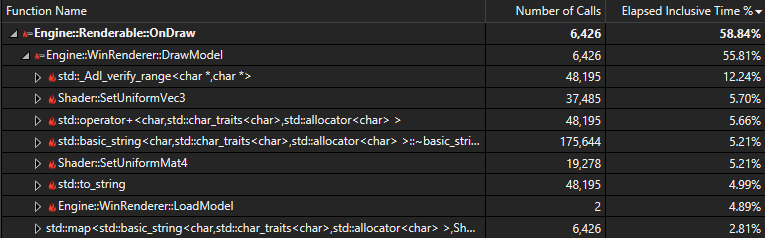
Profiler results
58% of the frame time is taken up by the Render event
25-30% of the frame time is taken up by std::string operations
Instead of making literal std::string's every draw call I now store the strings as member variables in the renderer class. And instead of string concatenation I decided to change a character in the string for each draw call, which is a very cheap operation. I also tested this in an isolated environment. You can see the results below.

The code
StaticString was my optimized solution, and StringConcatenation was my previous code.
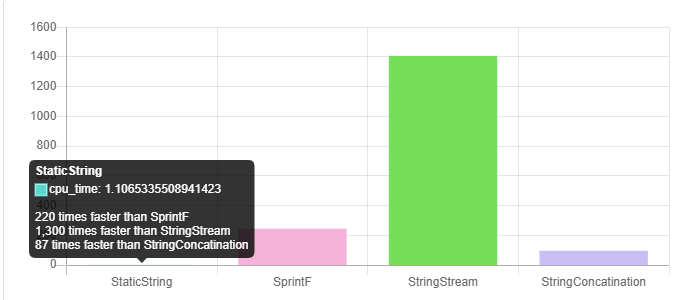
Results
87 times faster
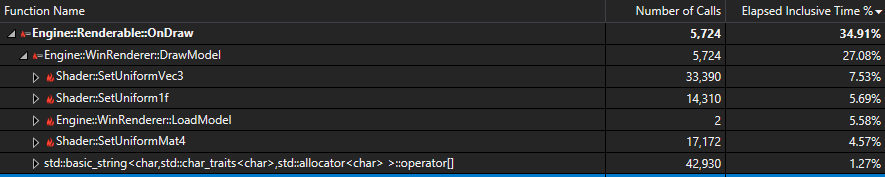
Optimized strings
The call graph after having optimized the strings.
After having optimized the strings I profiled again. In the image you see above you can see that the SetUniform functions are very slow. So I looked on what could cause the slowness in the function and found that what I thought previously would speed it up was actually slowing it down. I had an unordered map with Uniform locations and first looked if I had a key that matched and otherwise I would get it from the shader. So I replaced those unordered map search calls to just grabbing them always from the shader.

Final optimization
The time for each frame on average is 15%
To conclude, I started with 58% frame time taken up by the renderer. After the optimizations it became 15%. Which for a big part is taken up by the model loading. Model loading is included because of the lazy loading mentioned earlier.